Here's the truth: most cabinet boxes are structurally fine. It's the visible surfaces, doors, drawers, and finish, that show the wear. A weekend of focused work can deliver a dramatic transformation without the six-figure price tag or the six-week timeline.
This guide breaks the process into 13 clear steps, plus budget guidance and a note on when it's smarter to call in a professional like CKF.
Key Takeaways
- DIY cabinet painting costs about $200 in materials versus $5,000+ for full replacement
- Structurally sound boxes rarely need replacing, just refinished surfaces
- Proper prep (cleaning, sanding, priming) determines whether paint actually sticks
- The 1/3 rule is a solid starting point for hardware sizing, not a fixed rule
- Water damage or warping signals it's time to call a professional
Why DIY a Cabinet Makeover Instead of Replacing
Cabinet boxes are built to last decades, and what fails first is usually the finish, the hinges, or the hardware — not the plywood behind the door. If your cabinets are still square, don't sag, and close properly, replacement solves a problem you don't actually have.
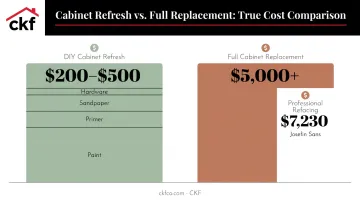
The cost gap tells the real story. This Old House estimates cabinet painting at about $200 in materials, compared to more than $5,000 for replacement cabinets in a standard 10x12-foot kitchen (This Old House). That's not a marginal difference, it's a different budget category entirely.
Beyond cost, a DIY refresh offers:
- Less waste — existing boxes stay put instead of heading to a landfill
- No lead time — skip the 6-12 week wait for custom cabinet orders
- Weekend-friendly scope — a mini refresh (hardware, doors) can wrap in a weekend; a full repaint takes a bit longer
Replacement makes sense when boxes are damaged, warped, or water-stained beyond repair. For everything else, refinishing wins on cost and speed — and if you want a professional-grade finish without doing every step solo, sourcing quality hardware or getting expert input on materials can still keep the project firmly in DIY-budget territory.
Tools, Materials & Budget Planning
Before you touch a screwdriver, gather your supplies. Having everything on hand prevents mid-project trips to the hardware store.
Core Toolkit
- Screwdriver or drill/driver
- Masking tape and a labeling system
- Sandpaper in multiple grits (100-125 for initial sanding, 220 for between coats)
- Tack cloth for dust removal
- TSP or degreaser cleaner
- Painter's tape and drop cloths
Material Choices
Your surface determines your primer. Bonding primer works for melamine and laminate, while oak or heavily grained wood may need a stain-blocking primer and grain filler first (BEHR Pro). For paint, cabinet-grade options like BEHR Cabinet, Door & Trim or Sherwin-Williams Emerald Urethane hold up better to daily wear than standard wall paint.
Budget Breakdown
| Item | Typical Cost |
|---|---|
| Cabinet-grade paint (1 gallon) | $56-$130 |
| Bonding primer | $55 |
| Sandpaper (5-pack) | $10 |
| Degreaser/TSP substitute | $5-$9 |
| Cabinet pulls (per piece) | $3-$4 |
These costs add up fast: a cabinet-only DIY makeover fits comfortably within a $5,000 budget, often landing at just a few hundred dollars. A full kitchen redo involving counters, floors, and appliances calls for careful prioritizing, since professional cabinet refacing alone averages $7,230 (HomeAdvisor).
Set aside 10-15% contingency for surprises like water damage behind hinges or stripped screw holes. You won't always know what's under old hardware until you remove it.
13 Steps to a DIY Kitchen Cabinet Makeover
Steps 1-3: Prep the Space and Remove Doors
Step 1: Clear and cover everything. Empty cabinets completely. Cover countertops and floors with drop cloths. Dust and paint splatter travel further than you'd expect.
Step 2: Remove and label. Take off every door, drawer, and piece of hardware. Use masking tape with a numbering system that matches each piece to its cabinet opening. Skipping this step means hours spent later guessing which hinge belongs where.
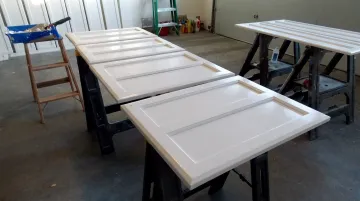
Step 3: Set up your workstation. A garage or covered outdoor space with good ventilation works best. Use sawhorses to keep doors flat while drying; hanging them risks drips and uneven coats.
Steps 4-6: Clean, Repair, and Sand
Step 4: Degrease thoroughly. Years of cooking residue sit on every cabinet surface, even ones that look clean. A TSP or vinegar-based cleaner strips this film so paint actually bonds (Benjamin Moore).
Step 5: Fill damage. Wood filler handles dents, nail holes, and gouges. Let it cure fully. Rushing this step means sanding through soft filler later.
Step 6: Sand and de-dust. Sherwin-Williams recommends 100-125 grit for this initial pass to scuff the existing finish (Sherwin-Williams). Wipe everything down with a tack cloth afterward. Leftover dust gets trapped under primer and shows through the final coat.
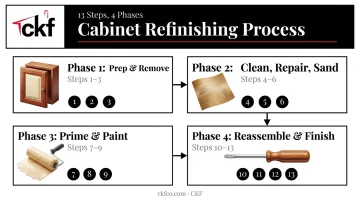
Steps 7-9: Prime and Paint
Step 7: Apply bonding primer. This step is non-negotiable for oak, laminate, or previously varnished surfaces. Skipping primer on these substrates is the number-one reason DIY paint jobs peel within months.
Step 8: Paint in thin coats. Use a foam roller or sprayer for a smooth finish. Apply thin, even coats rather than one thick layer. Thick coats drip and take far longer to cure properly. Follow your product's label for exact recoat timing:
- BEHR Cabinet, Door & Trim: 2-hour recoat
- INSL-X Cabinet Coat: 6-hour recoat
Step 9: Sand between coats. A light pass with 220-grit paper smooths brush marks for that factory-finish look. Follow with a protective clear topcoat for durability against daily kitchen wear.
Steps 10-13: Reassemble and Finish
Step 10: Reinstall hardware. Your labeling system from Step 2 pays off now—match each door back to its original opening. If you're upgrading pulls or hinges rather than reusing the old ones, brands like Top Knobs offer finishes that pair well with most repainted cabinet styles.
Step 11: Apply the 1/3 rule. For hardware placement, a common guideline suggests sizing pulls at roughly one-third the height of a cabinet door or width of a drawer front. It's a proportion guideline rather than a hard rule; some hardware brands note there's no strict code here (Top Knobs). Mock up placement with painter's tape before drilling anything.
Step 12: Install pulls and check alignment. Adjust hinges as needed for even gaps between doors. Even the best paint job looks unfinished if the spacing between doors is off.
Step 13: Add finishing touches. Under-cabinet lighting or new trim can elevate the whole look. Finish with a walkthrough to catch any spots needing touch-up paint.
Trend Ideas and Finishing Touches to Elevate the Look
Once the fundamentals are done, small style choices make a big difference.
What's trending right now?
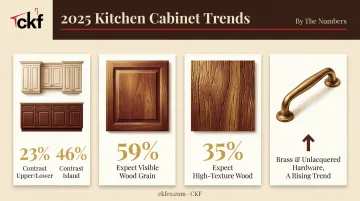
- Two-tone cabinetry — Houzz found 23% of homeowners contrasted upper and lower cabinet colors, while 46% contrasted island cabinets specifically (Houzz 2024 Kitchen Trends)
- Warm wood tones — NKBA found 59% of designers expected visible wood grain to stay popular
- Textured, natural finishes — 35% expected high-texture natural wood specifically
- Brass and unlacquered hardware — increasingly favored over polished chrome for a warmer look
These trends aren't just for full renovations — several translate directly into your DIY cabinet project through small, low-cost extras:
- Open shelving to break up upper cabinet runs
- Glass-front inserts on a few doors for visual variety
- Removable wallpaper inside glass-front or open cabinets
Pairing your refreshed cabinets with a new countertop or backsplash can modernize the entire kitchen without a full gut renovation. It's often the single best way to make a DIY paint job look like a designer's finished project, and providers like CKF offer quartz, granite, and hardware options that can complete the look once your cabinets are done.
When a DIY Makeover Isn't Enough: Calling in the Professionals
Not every kitchen is a good candidate for a cosmetic refresh. Watch for these warning signs:
- Water damage — swollen, delaminating, or soft wood at the base of cabinets
- Warping — doors that no longer sit flush regardless of hinge adjustment
- Structural instability — boxes that flex, separate at joints, or no longer anchor securely to the wall
If you spot any of these, painting won't fix the underlying problem. Refacing or full replacement becomes the smarter long-term investment.
CKF's design team, with showrooms across the Midwest since 1923, can help you weigh refacing against full replacement once a DIY project uncovers bigger issues.
Even if your cabinets pass inspection, a design consultation is still worth scheduling. Pairing fresh paint with a complementary custom countertop, without a full gut renovation, creates a cohesive, finished look that a cabinet update alone can't always achieve.
Frequently Asked Questions
What is the 1/3 rule for cabinets?
It's a hardware-placement guideline suggesting pulls should measure roughly one-third the height of a door or width of a drawer front. Treat it as a starting point for proportion, not a strict rule, so mock up placement before drilling.
Can you redo a kitchen for $5,000?
A cabinet-focused DIY makeover fits easily within that budget, often costing just a few hundred dollars in materials. A full remodel with new counters and appliances requires prioritizing since those costs add up quickly.
What is the newest trend in kitchen cabinets?
Two-tone cabinetry, especially contrasting island colors, along with warmer wood tones and textured, matte finishes are leading current designs. Brass and unlacquered hardware finishes are also gaining popularity.
How long does a DIY cabinet makeover typically take?
A mini refresh, hardware and minor touch-ups, can wrap in a weekend. A full paint job with proper prep and dry time between coats typically takes one to two weeks.
Do I need to sand cabinets before painting them?
Sanding helps paint adhere properly and is the standard recommendation from most paint manufacturers. Liquid deglossers can work as a lower-mess alternative, but only on surfaces the product label specifically covers.
Can I update my cabinets without painting them at all?
Yes. New hardware, trim or molding, under-cabinet lighting, or glass-front inserts can refresh the look without a single coat of paint. If you want a bigger change without a full replacement, cabinet refacing or new cabinet fronts are also worth considering.