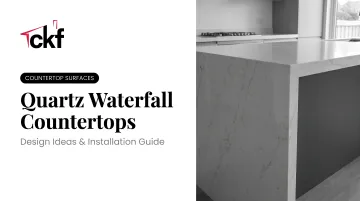
But achieving that effect isn't straightforward. A waterfall countertop requires precision CNC fabrication, careful structural preparation, and professional installation. Skip steps, and the result is a visible seam at the miter joint, a gap at the floor, or a veining pattern that doesn't match across the corner — problems that are expensive and difficult to correct after the fact.
This guide covers everything you need to know: why quartz works best for this application, design ideas worth considering, and a step-by-step installation breakdown that shows exactly where failures happen and how to prevent them.
Key Takeaways
- Quartz's engineered consistency makes veining alignment at the miter joint achievable — natural stone cannot reliably match this
- Order the horizontal top and vertical panels from the same production batch to avoid visible color variation at the seam
- Unsupported overhangs: keep 20 mm quartz under ~12 inches and 30 mm quartz under ~16 inches before adding support
- Use color-matched epoxy at the miter joint — mismatched adhesive is the most visible indicator of poor workmanship
- Cabinet levelness, floor levelness at the waterfall leg, and overhang dimensions must all be verified before fabrication is ordered
Why Quartz Is the Best Material for a Waterfall Edge
The waterfall edge demands one thing above all else: consistency. The top surface and the vertical panel have to read as a single continuous piece, which means the color, density, and veining pattern need to behave predictably across both planes.
Quartz delivers this reliability where natural stone falls short. As Architectural Digest notes, quartz patterns are more predictable and easier to align than real stone across horizontal and vertical planes. Natural stone's veining variation makes seamless pattern flow across a miter joint difficult — or impossible — to guarantee every time.
Durability on Both Faces
A waterfall panel isn't just decorative. The vertical face takes daily contact from barstools, bags, and foot traffic. Quartz handles this well.
Key durability advantages for waterfall applications:
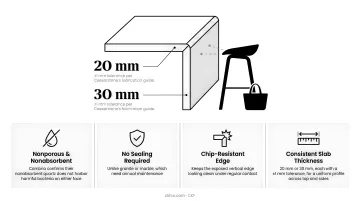
- Nonporous surface resists staining and bacterial growth on both horizontal and vertical faces — Cambria confirms their nonabsorbent quartz does not harbor harmful bacteria
- No sealing required, unlike granite or marble, which need annual maintenance
- Chip resistance keeps the exposed vertical edge looking clean under regular contact
- Consistent slab thickness (20 mm or 30 mm, each with a +/-1 mm tolerance per Caesarstone's fabrication guide) allows fabricators to create a uniform profile across top and sides
One Important Caveat
Even with engineered quartz, slight tone, vein-position, and graphic-definition differences can occur between production runs. Silestone's quality standards documentation acknowledges this directly. This is why slab batch matching — sourcing the top and vertical panels from the same production run — is a required step in proper waterfall fabrication. Skipping it risks a visible mismatch at the miter joint that no amount of finishing can fix.
Quartz Waterfall Countertop Design Ideas
Getting Veining Alignment Right
The single most consequential design decision for a quartz waterfall countertop is how the veining transitions from the horizontal top to the vertical panel. When the veining flows uninterrupted across the miter joint, the countertop reads as a single sculpted object. When it doesn't, you get two slabs that look like they happened to end up next to each other.
Book-matching is the technique that achieves the seamless result: the fabricator cuts and mirrors the slab so veining flows uninterrupted across the miter joint. This requires the fabricator to plan the cut layout on the digital template before any cutting begins, mapping exactly where the pattern will land on both surfaces.
Some Silestone options in CKF's inventory are particularly well-suited to this:
- Victorian Silver (Silestone) — prominent white and dark grey veins on a light grey background with high translucency; creates a dramatic, natural stone-like effect in a waterfall configuration
- Luxury Borghini (Compac) — fine smoky grey veining on a white background; well-suited to high-end waterfall designs where a quieter pattern is preferred
Edge Profile and Cabinet Pairing
Edge profile directly affects whether the waterfall works visually. A square or straight edge maintains the clean, continuous lines the design depends on. Ornate profiles — bullnose, ogee, anything with rounding or layering — interrupt the cascading effect and look disjointed where the top meets the side panel.
For cabinet pairing, contrast amplifies the countertop's impact:
- Light, veined quartz against dark wood base cabinets makes the stone the focal point
- Bold dark quartz against white flat-panel cabinets creates a graphic, modern statement
- The double waterfall — quartz panels on both ends of an island — delivers maximum sculptural presence in larger kitchens
CKF's portfolio illustrates this principle well. Their 360 Signature line in Urbane Bronze paired with Silestone Versailles Ivory shows how dark cabinetry makes a lighter quartz surface read as a prominent design element rather than background material.
Applications Beyond the Kitchen Island
The waterfall edge works in any setting where you want a surface to read as a single sculpted object:
- Bathroom vanities — same installation precision, same high-end result
- Home office desks — adds visual weight and a furniture-like quality
- Entryway consoles — a strong first impression that doesn't require elaborate millwork
Thickness decisions follow regardless of the application — which brings its own set of trade-offs.
Thickness and Visual Weight
Standard 20 mm slabs produce a sleek, minimal profile. For more visual weight — a look closer to solid stone block — fabricators can use laminated or mitered-edge builds that simulate a thicker appearance.
The top and side panels must always match in thickness. Mixing thicknesses at the miter joint is immediately visible — and cannot be corrected without remaking the piece entirely.
Installation Guide for Quartz Waterfall Countertops
Installation follows a defined sequence. Skipping or rushing any phase typically results in failures that require full panel replacement — not a touch-up.
Prerequisites and Planning Considerations
Three site readiness checks must happen before fabrication is ordered:
Cabinet structure must be level, plumb, and capable of bearing the added weight of vertical quartz panels. Cambria's installation requirements specify cabinets no more than 1/8 inch out of plane over every 8 feet; Caesarstone's architectural specification is stricter at 1/16 inch in 10 feet. Use whichever standard applies to your selected material.
Floor levelness at the waterfall leg must be verified before fabrication. Even minor variation will create a visible gap at the base of the vertical panel — and that gap cannot be corrected without recutting the panel.
Seating overhang dimensions must be confirmed against quartz span limits. Per Caesarstone's fabrication guide, 20 mm quartz allows unsupported overhangs under approximately 300 mm (about 12 inches); 30 mm quartz allows under approximately 400 mm (about 16 inches). Anything beyond these limits requires corbels, steel brackets, or embedded reinforcement — and that planning must happen before cabinetry is finalized, not after.
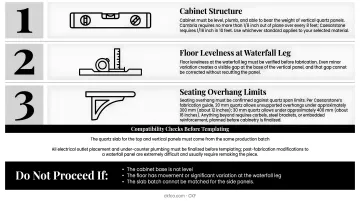
Compatibility checks before templating:
- The quartz slab for the top and vertical panels must come from the same production batch
- All electrical outlet placement and under-counter plumbing must be finalized before templating — post-fabrication modifications to a waterfall panel are extremely difficult and usually require remaking the piece
Do not proceed if:
- The cabinet base is not level
- The floor has movement or significant variation at the waterfall leg
- The slab batch cannot be matched for the side panels
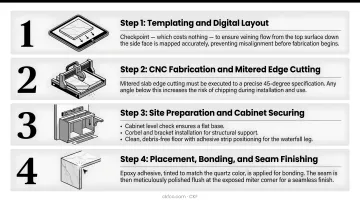
How to Install a Quartz Waterfall Countertop
Step 1 — Templating and digital layout
A precise digital template captures exact dimensions of the island top and each vertical panel face. The fabricator uses this data to map where veining will flow from top to side. Review and approve that digital layout before fabrication begins. This single checkpoint — which costs nothing — prevents the most common aesthetic disappointment: a pattern that doesn't align as expected.
Step 2 — CNC fabrication and mitered edge cutting
The top slab and vertical panels are cut using CNC equipment, which produces the precise 45-degree mitered edges required for a seamless join. Caesarstone's fabrication guide specifies that miter edges must be fabricated at exactly 45 degrees — angles below 45 degrees leave the edge prone to chipping. CNC technology provides the repeatability that manual cutting cannot consistently achieve, which is why shops relying on hand tools alone are a risk on this type of work.
CKF's in-house fabrication facility handles mitered edge work across residential and commercial quartz projects — including installations at Ashland Brewing Company — with the same CNC process and quality standards every time.
Step 3 — Site preparation and cabinet securing
Before quartz arrives on site:
- Confirm cabinet level one final time
- Install any corbels or support brackets required for seating overhangs
- Ensure the floor at the waterfall leg landing point is clean and free of debris
- Position adhesive strips or brackets to receive the countertop
Step 4 — Placement, bonding, and seam finishing
Start with the horizontal top: secure it to the cabinet substrate with adhesive. Then lift the vertical waterfall panels into position, aligning the mitered edge precisely to the top. Epoxy adhesive — tinted to match the quartz color — is applied to the joint, and seams are polished flush.
Color-matched epoxy is not optional. Caesarstone's fabrication guide requires visible adhesive to be tinted to match the quartz and notes that mixed adhesive may dry slightly lighter. The adhesive line sits at the exposed outside corner of the miter joint — any color difference makes the seam immediately visible.
Post-Installation Checks
Before the installation is considered complete, verify:
- Miter joint: No visible gap, step, or color variation across the join line
- Vertical panel base: Sits flush to the floor with no rocking or gap
- Horizontal surface: Level, with overhang matching the approved plan
Each item on that list has a real consequence if missed:
- A hairline miter gap collects grime and widens over time
- A floor gap becomes more visible once surrounding flooring is installed
- An unsupported overhang will eventually crack under load
Catching these before the kitchen is finished costs far less than fixing them after.
Common Installation Problems and Fixes
Nearly all quartz waterfall installation failures trace back to preparation or fabrication shortcuts. The three problems below cover the most common ones — and what it actually takes to fix them.
Visible Seam or Step at the Miter Joint
A visible line, gap, or step where the top panel meets the vertical panel usually points to one of three causes: an inaccurate miter angle, mismatched slab batches with slight color variation, or insufficient clamping pressure during adhesive cure.
A hairline cosmetic gap may be resolved with color-matched epoxy fill and polish. A structural step or significant color mismatch requires the affected panel to be recut or replaced. Slab batch matching and CNC precision need to be locked in before fabrication starts — there's no clean fix after the fact.
Waterfall Panel Gap at the Floor
A visible gap between the base of the vertical panel and the floor — especially noticeable after flooring goes in — typically means floor levelness wasn't verified before fabrication, or the panel was cut to a fixed height without scribing to the floor's actual contour.
Minor gaps can be filled with color-matched caulk as a temporary measure. The permanent fix requires recutting the panel with a scribed profile that matches the floor. Catching this during post-installation checks, before flooring is laid, saves a costly second round of work.
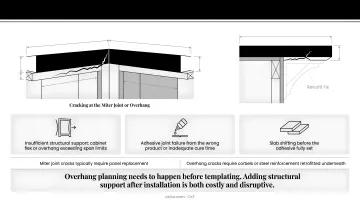
Cracking at the Miter Joint or Overhang
A crack at the miter joint or along the underside of a cantilevered overhang — sometimes showing up weeks after the job is complete — usually traces to insufficient structural support (cabinet flex, overhang exceeding span limits), adhesive joint failure from the wrong product or inadequate cure time, or the slab shifting before the adhesive fully set.
Miter joint cracks typically require panel replacement. Overhang cracks require corbels or steel reinforcement retrofitted underneath. Overhang planning needs to happen before templating; adding structural support after installation is both costly and disruptive.
Pro Tips for a Flawless Quartz Waterfall Countertop
A few decisions made before and during installation separate a good waterfall countertop from a great one.
Request a digital vein layout approval before fabrication is confirmed. Ask the fabricator to show exactly how the veining will transition from the horizontal top to the vertical panel. This step eliminates the most common aesthetic disappointment — and it adds no cost.
Choose the slab before finalizing cabinet selections. The quartz surface anchors the entire visual composition of an island, so selecting it first lets you build cabinet finish, hardware, and flooring decisions around it. This produces a more intentional result than retrofitting a slab choice to cabinets already ordered. CKF's showrooms handle cabinetry and countertop selection in one location, which makes this sequencing easy without coordinating across multiple vendors.
Protect vertical panel edges through construction completion. The exposed corners of a waterfall panel are vulnerable to impact from appliance carts, paint equipment, and furniture moving. Keep temporary corner protection — foam padding or cardboard — in place until all trade work is finished.
Conclusion
A quartz waterfall countertop delivers lasting design impact because it's engineered for consistency — but that consistency only shows up when the fabrication is precise, the installation is structurally sound, and the post-installation checks confirm every joint is flush and every seam is sealed correctly.
Treat selection and installation as a single integrated project. Each step determines what the next one can achieve:
- Choose a slab with consistent veining and confirmed lot availability for matched panels
- Plan the layout with your fabricator before anything is cut — waterfall runs are unforgiving
- Verify cabinet and wall structure can support the full panel weight
- Work with a fabricator who has CNC precision capability and an experienced installation team
Once panels are cut, there's no correcting fabrication shortcuts. Getting these decisions right from the start is what separates a clean, lasting installation from one that shows its problems at the seams.
Frequently Asked Questions
Are quartz waterfall countertops worth it?
Quartz waterfall countertops deliver high-impact aesthetics with low-maintenance durability: no sealing required, stain resistant on all faces, and the side panels protect cabinet ends from daily wear. For open-plan kitchens where the island anchors the space, they're a strong long-term investment.
Are quartz waterfall countertops out of style?
The waterfall edge has stayed relevant because it aligns with lasting design principles — seamless surfaces, large-format slabs, minimal hardware — not a short-lived trend. Better Homes and Gardens reports it's been popular for 10–15 years, with no sign of decline.
Can you create a waterfall edge with quartz?
Yes, and quartz is well-suited for it. Its engineered consistency allows the pattern to be book-matched across the miter joint, creating a seamless appearance that is difficult to reliably achieve with natural stone's unpredictable veining variation.
How much do quartz waterfall countertops cost?
Three factors drive cost above a standard countertop installation: additional material for the vertical panels, a fabrication surcharge for precision mitered edge cutting, and any structural support required for seating overhangs. For a specific estimate based on your material selection and island dimensions, contact CKF directly for a project quote.
How thick should a quartz waterfall countertop be?
Standard thicknesses are 20 mm and 30 mm. Both the top and side panels must match throughout — mixing thicknesses at the miter joint is immediately visible. A thicker profile adds visual presence and can be achieved through laminated or mitered edge builds when a full-thickness slab isn't available.
Can a waterfall countertop be added to an existing island?
Retrofitting is possible but requires professional assessment first. Cabinet structure, floor levelness at the waterfall leg, and overhang dimensions must all be evaluated before fabrication. The original countertop must also be removed cleanly so the new mitered assembly sits correctly.